Saturday, 9 September 2017

OIM - SQL Query to get all the Users having specific entitlement provisioned.


SELECT USR.USR_LOGIN, USR.USR_FIRST_NAME, USR.USR_LAST_NAME
FROM ENT_LIST EL, ENT_ASSIGN EA, USR
WHERE EL.ENT_LIST_KEY = EA.ENT_LIST_KEY
AND EA.USR_KEY = USR.USR_KEY
AND EA.ENT_STATUS = 'Provisioned'
AND EL.ENT_CODE = '<Replace_Entitlement_Name>';


OIM - SQL Query to get all the Users having specific account provisioned.


SELECT USR.USR_LOGIN, USR.USR_FIRST_NAME, USR.USR_LAST_NAME
FROM OBJ,OBI,OIU,OST,USR
WHERE OBJ.OBJ_KEY = OBI.OBJ_KEY
AND OBI.OBI_KEY = OIU.OBI_KEY
AND OIU.USR_KEY = USR.USR_KEY
AND OIU.OST_KEY = OST.OST_KEY
AND OST.OBJ_KEY = OBJ.OBJ_KEY
AND OST.OST_STATUS IN ('Enabled','Provisioned')
AND OBJ.OBJ_NAME = '<Replace_Resource_Object_Name>';


Wednesday, 6 September 2017

OIM 11g R2 - How to allow OIM with duplicate email address.


By default OIM does not allow duplicate email address for users but some time due to business requirement we have to allow. 

To allow duplicate email address, perform the below steps:

Login to System Administrator Console and click on "Configuration Properties" link.


Click on create as highlighted below.


Add the below Property and click on "Perform".


Property Name = Email Uniqueness 
Keyword = OIM.EmailUniqueCheck
Value = FALSE


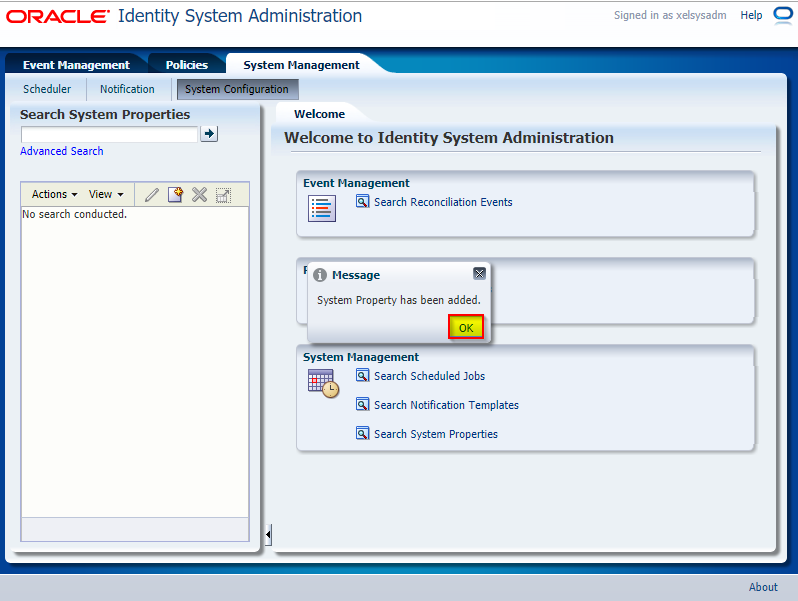
After clicking perform it should show “System Property has been Added” message.


Happy Learning!!!

Configure CRON Job to transfer file from one host to another.


1. Set up SSH Public Key Authentication to connect to a remote host.


2. Create shell script to transfer file.


#!/bin/bash
HOST="<Destination_Host_Name> "
USER="<Destination_Host_User_Name>"
FILE="<Complete_File_Path_With_File_Name>" 
sftp $HOST <<END_SCRIPT
cd /<Destination_Directory_Location>
put $FILE
END_SCRIPT
echo "File transfer successfully......."
exit 0


Save this file. Let say "fileTransferScript.sh"

3. Add entry in CRONTAB file.


1. Login to source host.

2. Go to folder etc
    cd /etc

3. Use following command to edit CRONTAB file.
    crontab -e

4. Add following cron job entry in file.
   * * * * * <Script_Path>/fileTransferScript.sh

Note: This entry will run the script every minute to transfer file.

Below table will help you to schedule cron job:


Field
Allowed values
Minute (First *)
0-59
Hour (Second *)  
0-23
Day of month (Third *)    
1-31
Month (Fourth *)
1-12 or Names like Jan, Feb
Day of week (Fifth *)
0-7 (0 or 7 is Sunday)


Some Examples:

15 6 2 1 * /fileTransferScript.sh
Script will run on 2nd January at 6:15 A.M.

15 06 02 Jan * /fileTransferScript.sh
Same as the above entry.

0 9-18 * * * /fileTransferScript.sh
Script will run on every hour from 9 A.M. through 6 P.M on every day.

0 9,18 * * Mon /fileTransferScript.sh
Script will run at 9 A.M. and 6 P.M on every Monday.

30 22 * * Mon,Tue,Wed,Thu,Fri /fileTransferScript.sh
Script will run at 10:30 P.M every weekday.


Happy Learning!!!

Set up SSH Public Key Authentication to connect to a remote host.

Host Server: host@example.co.in
Remote Server: remote@example.co.in

1. Login to the host server.

2. Keys will be located in the directory .ssh, if the .ssh folder is not present create at the user home.
      mkdir ~/.ssh

3. Change the permissions on our .ssh directory.
      chmod 700 ~/.ssh

4. Generate the keys using following commands.
      ssh-keygen

5. It will prompt you for the information it needs to generate the keys. Use all the default values (just press enters at every prompt).


6. Your keys are now generated.
Go to .ssh folder, There should be 2 files in .ssh folder id_rsa and id_rsa.pub

7. Change the permissions of these files.
      chmod 700 ~/.ssh/id_rsa*

8. Now SSH to your remote server.
     ssh oracle@remote.example.co.in
     Enter your password and log in

9. Check if the .ssh directory exists on the server. If not then create at the user’s home.
      mkdir ~/.ssh

10. Change the permissions on our .ssh directory.
      chmod 700 ~/.ssh

11. Check if authorized_keys file is present in .ssh folder.
      If it doesn't, create it. You can use touch command to create an empty file.
           touch ~/.ssh/authorized_keys

12. Change the permissions on our authorized_keys file.
      chmod 700 ~/.ssh/authorized_keys

13. Logout from the remote server to return to the host server command prompt.
      Logout

14. Go to .ssh folder and copy contents of your local public key file (~/.ssh/id_rsa.pub, which you created earlier with ssh-keygen) into the file ~/.ssh/authorized_keys on remote server.
    vi id_rsa.pub
  • Copy content
  • Login to remote server in separate window
  • Go to .ssh folder 
           vi authorized_keys 
  • Paste the content and save the file

This completes the process of creating SSH configuration on both the servers.


Happy Learning!!!

Tuesday, 5 September 2017

How to hide 'Administration Roles' tiles in OIM 11g R2 PS3?

We can hide "Administration Roles" tiles from Self Service Console through System property.


Login to System Administrator Console and click on "Configuration Properties" link.


Search "Workflows Policies Enabled" and open it.

Enter value - "false" and then save.


Restart OIM Server.


Now we can see, 'Administration Roles' tiles is not visible in Self Service Console.


Happy Learning!!!

SQL Query - How to Remove Account from User's Account Tab in OIM.

Below SQL queries will remove specified account from user account tab.


1. Delete entry from child table:


Note: Execute this query if application has entitlements.

DELETE FROM <Replace_Child_Table_Name>
WHERE ORC_KEY IN
  (SELECT OIU.ORC_KEY FROM OIU, <Replace_Child_Table_Name> CT
     WHERE OIU.ORC_KEY = CT.ORC_KEY
     AND OIU.APP_INSTANCE_KEY = (SELECT APP_INSTANCE_KEY FROM  APP_INSTANCE WHERE APP_INSTANCE_NAME = '<Replace_Application_Instance_Name>')
  );

2. Delete entry from parent table:


DELETE FROM <Replace_Parent_Table_Name>
WHERE ORC_KEY IN
  (SELECT OIU.ORC_KEY FROM OIU, <Replace_Parent_Table_Name> PT
WHERE OIU.ORC_KEY= PT.ORC_KEY
AND OIU.APP_INSTANCE_KEY = (SELECT APP_INSTANCE_KEY FROM APP_INSTANCE WHERE APP_INSTANCE_NAME = '<Replace_Application_Instance_Name>')
  );


3. Delete entry from OIU table:


DELETE FROM OIU
WHERE ORC_KEY IN
  (SELECT OIU.ORC_KEY FROM OIU, ORC
WHERE OIU.ORC_KEY = ORC.ORC_KEY
AND OBI_KEY IN (SELECT OBI_KEY FROM OBI WHERE OBJ_KEY = (SELECT OBJ_KEY FROM OBJ WHERE OBJ_NAME = '<Replace_Resource_Object_Name>'))
);


Happy Learning!!!