Saturday, 28 May 2016

Oracle Unified Directory(OUD) - Direct Provisioning.


Login to Identity Self Service Console using "xelsysadm" credential and go to "Manage".


Go to Users tab.


Search user and go to his Account tab.


Click on Request Accounts tab.


Add OUD App to the Cart.


Click Next.


Click on edit icon.


 Select Container DN and enter value for other mandatory fields. 


Click Update.


Click on Submit.


OUD is provisioned to abadal.


Related Posts :
Oracle Unified Directory(OUD) Installation and Configuration.
Oracle Unified Directory(OUD) Connector Installation and Configuration.


Happy Learning!!!

Oracle Unified Directory(OUD) Connector Installation and Configuration.


Download the zip file : OID-11.1.1.6.0.zip from below link,

http://www.oracle.com/technetwork/middleware/id-mgmt/downloads/connectors-101674.html

Upload it to the following location :

           $MW_HOME/Oracle_IDM1/server/ConnectorDefaultDirectory

Unzip it in the same directory i.e. ConnectorDefaultDirectory and perform following steps : 


Login to System Administrator Console using "xelsysadm" credential and click on "Manage Connector".


Click on "Install".


Select "ODSEE/OUD/LDAPV3 Connector 11.1.1.6.0" from Connector List. 


Click on "Load". 


Click on "Continue".


Click on "Exit".

Go to IT Resource tab.


Search LDAP. 


 Click on edit icon.


Enter value for required parameters and click Update.


Go to Sandboxes as shown in below screen shot.


Go to Create Sandbox.


Give sandbox name and click on Save and Close.


Click on Form Designer tab.


Click on Create.


 Select Resource Type and enter Form Name and then click Create.


App form is created.


Go to Application Instance tab.


Click on Create as highlighted in below screen shot.


Enter value for highlighted fields and then click Save.


Application Instance is created.


Publish Sandbox.


Run the below schedulers to recon group and organization unit in OIM :

               1. LDAP Connector OU Lookup Reconciliation  

               2. LDAP Connector Group Lookup Reconciliation 

               3. Catalog Synchronisation Job.


Click on Scheduler tab.


Search  "LDAP Connector OU Lookup Reconciliation" and click on "Run Now".


Search  "LDAP Connector Group Lookup Reconciliation" and click on "Run Now".


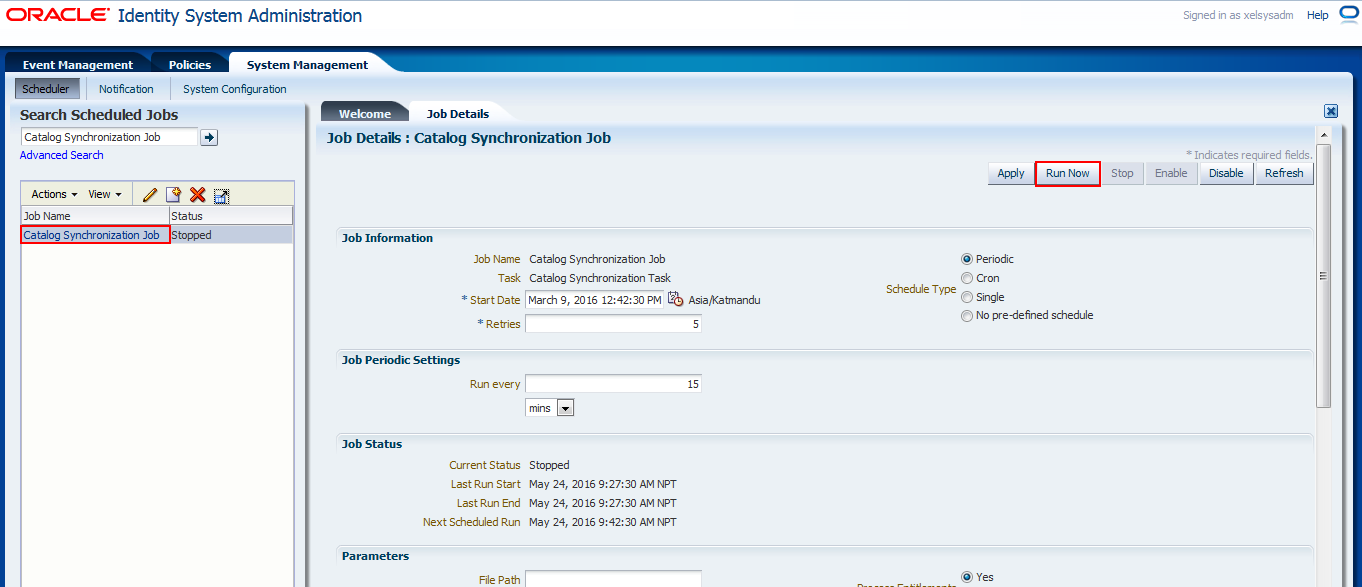
 Search  "Catalog Synchronization Job" and click on "Run Now". 


Related Posts :


Happy Learning!!!

Friday, 27 May 2016

Oracle Application Development Framework(ADF) Installation.


Download ADF Installer from below link :


Unzip the Oracle Application Development Framework zip file

        $ unzip ofm_appdev_generic_11.1.1.6.0_disk1_1of1.zip


Change to the Disk1 directory

        $ cd <download-path>/appdev/Disk1


Set environment variables : 

        export JAVA_HOME=<java directory path>/jdk1.7.0_71
        export PATH=$JAVA_HOME/bin:$PATH


Start the Oracle Universal Installer by running the runInstaller script :

       $ ./runInstaller -jreLoc JAVA_HOME


Click on Next.


Select "Skip Software Updates" option and then click on Next.


Click on Next.


 Click on Next.


 Click on Next.


 Click on Install.


 Click on Next.


 Click on Finish.

 ADF is installed successfully.


Happy Learning!!!

Thursday, 26 May 2016

Enable Certification tab in OIM 11gR2PS1 or 11gR2PS2.

Login to sysadmin console :


Click on System Configuration, shown in below screen shot.

 Search "Display*"

Set property "both" and save.


Restart OIM server.